2017/08/03 - Named Data Networking (NDN) installation guide - part 1
Introduction
In this installation guide, I will demostrate how to install ndn-cxx, nfd, and use ndnping to test two node are reachable. After I succeed to test ndnping, I will use Wireshark to dissect NDN packets.
My Platform
Ubuntu 16.04.2 Server (64-bit)
ndn-cxx installation 1
Overview
ndn-cxx is a C++ library, implementing Named Data Networking (NDN) primitives that can be used to implement various NDN applications. The library is current being used as part of some projects, see more projects.
Requirement
python >= 2.6
libsqlite3
libcrypto++
OpenSSL >= 1.0.1
pkg-config
Boost libraries >= 1.54
Install all requirements
sudo apt-get install build-essential libcrypto++-dev libsqlite3-dev libboost-all-dev libssl-dev
Download ndn-cxx source from github 2
git clone https://github.com/named-data/ndn-cxx && cd ndn-cxx
git reset --hard b555b00c280b9c9ed46f24a1fbebc73b720601af
Build ndn-cxx
Change directory to the ndn-cxx, then use the following commands :
./waf configure --with-examples
./waf
sudo ./waf install

sudo ln -s /usr/local/lib/libndn-cxx.so.0.5.1 /usr/lib/
Now, if we want to run the ndn-cxx example, we also need NFD to forward our pakcets.
NFD installation
Overview
Named Data Networking Forwarding Daemon (NFD) is a network forwarder that implements and evolves together with the Named Data Networking (NDN) protocol. After the initial release, NFD will become a core component of the NDN Platform and will follow the same release cycle.
Install all requirements
sudo apt-get install pkg-config libpcap-dev
Download NFD source from github 3
git clone --recursive https://github.com/named-data/NFD && cd NFD
git reset --hard f4056d0242536f85b7d7b4de1b5ac50dad65c233
Build NFD
Change directory to the NFD, then use the following commands :
./waf configure
./waf
sudo ./waf install
Then create the config file :
sudo cp /usr/local/etc/ndn/nfd.conf.sample /usr/local/etc/ndn/nfd.conf
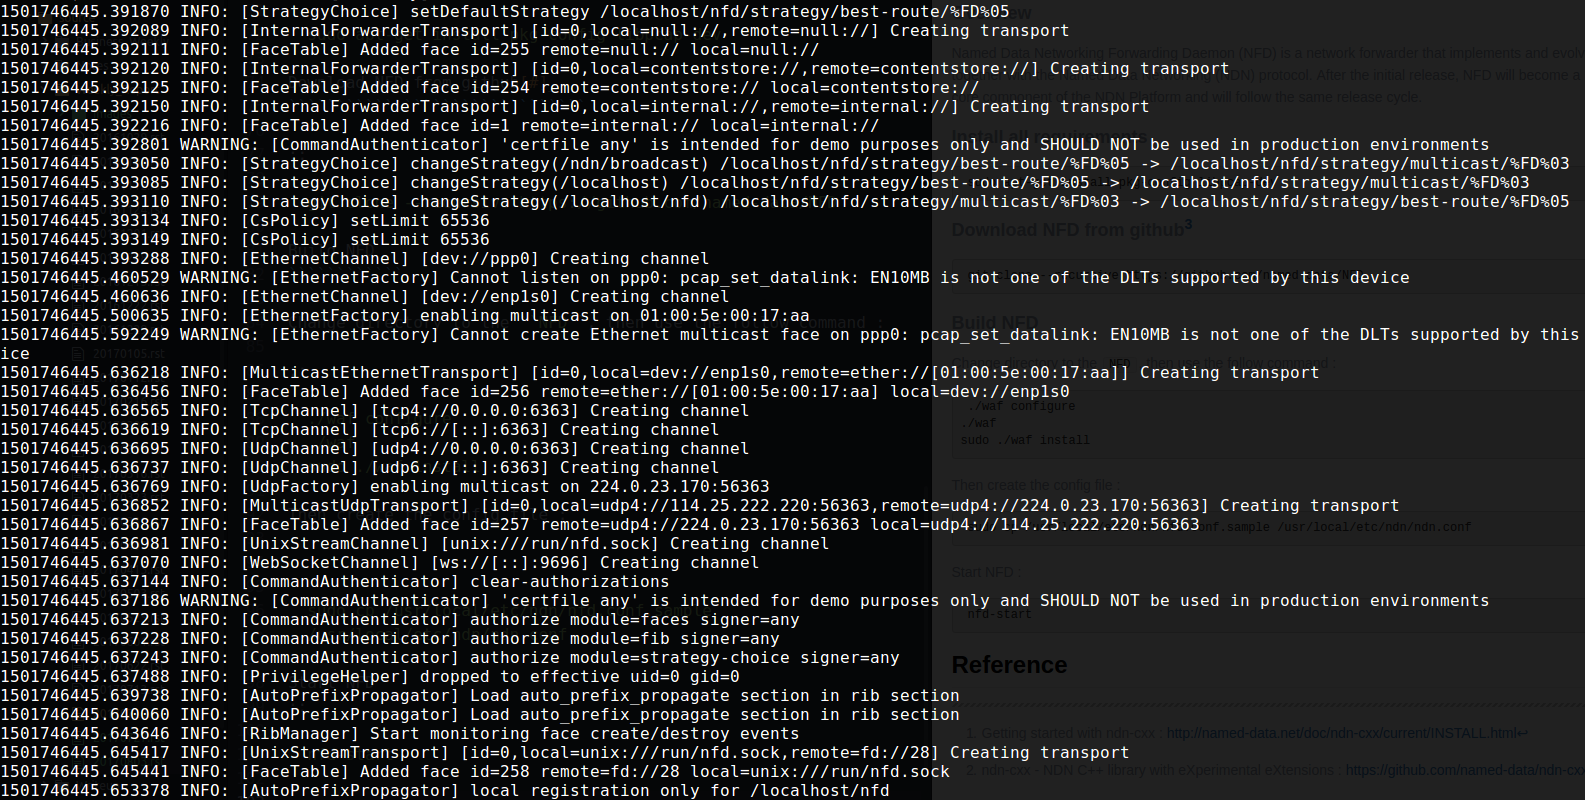
Start NFD
nfd-start
If nfd-start succeed, messages may show like below :
Run the ndn-cxx example
Test on localhost
Now we can run ndn-cxx example to test our installation on localhost.
Terminal 1 :
cd ~/ndn-cxx
./build/examples/producer

Terminal 2 :
cd ~/ndn-cxx
./build/examples/consumer

Test on two nodes
Assume that we have two nodes :
PC1 (producer) : 192.168.1.101
PC2 (consumer) : 192.168.1.102
PC2 needs to know the route to PC1
nfdc register /example/testApp udp://192.168.1.101
Then run producer program on PC1 and run consumer on PC2.
ndn-tools installation 4
Overview
ndn-tools is a collection of essential tools for Named Data Networking. These tools are recommended to be installed on all NDN nodes.
Tools in this collection include:
ping
dump
dissect-wireshark
… see more
Download source from github
git clone https://github.com/named-data/ndn-tools.git && cd ndn-tools
git reset --hard c9575a6aa3372875aecb627d9e169c0955135bd8
Build
Change directory to the ndn-tools, then use the following commands :
./waf configure
./waf
sudo ./waf install
Test ndnping 5
PC1 (192.168.1.101)
ndnpingserver ndn:/example/testApp
PC2 (192.168.1.102)
nfdc register /example/testApp udp://192.168.1.101
ndnping ndn:/example/testApp
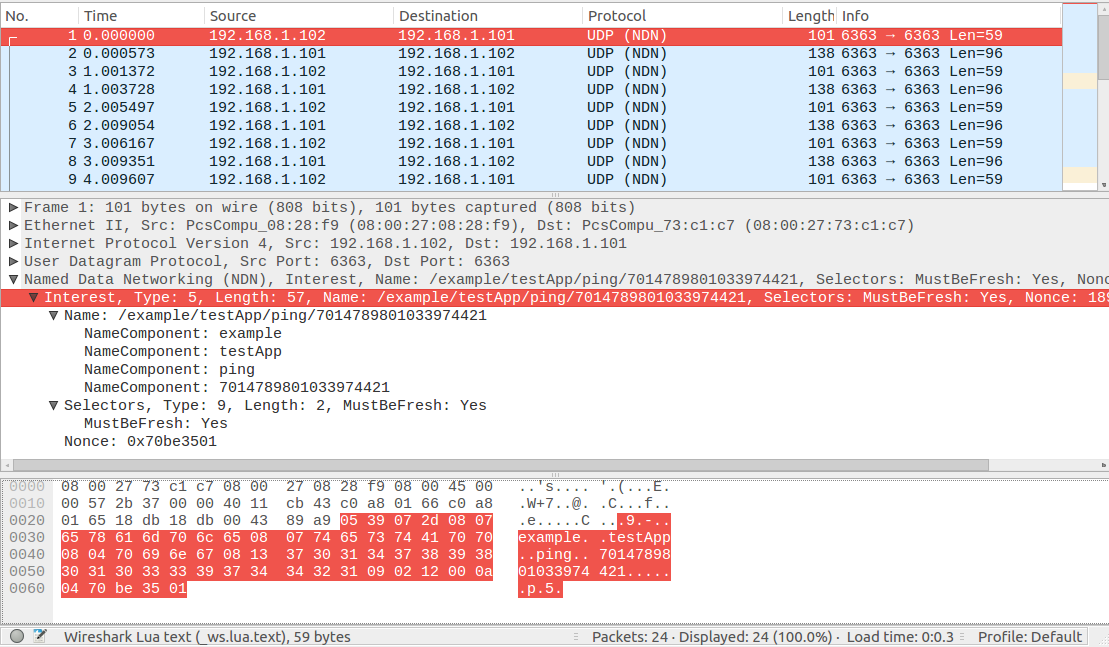
Using Wireshark to dissect NDN packets
To enable NDN packets dissector for all future Wireshark sessions, you can create/edit Wireshark’s init.lua script, which located in /usr/share/wireshark. The dofile command should be added to the end of init.lua file:
-- dofile("/full/path/to/ndn.lua")
dofile("/usr/local/share/ndn-dissect-wireshark/ndn.lua")
Then the wireshark can recognize the NDN packets:
Reference
- 1
Getting started with ndn-cxx : http://named-data.net/doc/ndn-cxx/current/INSTALL.html
- 2
ndn-cxx - NDN C++ library with eXperimental eXtensions : https://github.com/named-data/ndn-cxx
- 3
NFD - Named Data Networking Forwarding Daemon : https://github.com/named-data/NFD
- 4
NDN Essential Tools : https://github.com/named-data/ndn-tools
- 5
ndnping and ndnpingserver : https://github.com/named-data/ndn-tools/tree/master/tools/ping