2017/11/13 - Named Data Networking (NDN) installation guide - part 2
Introduction
In this installation guide, I will demostrate how to install ndnfs-port and use fetch-media.html in NDN-JS.
My Platform
Ubuntu 16.04.2 Server (64-bit)
NDNFS installation 1
Overview
NDNFS: NDN-friendly file system (based on FUSE)
Install ndn-cpp 2
Before installing NDNFS, we have to install ndn-cpp first.
git clone https://github.com/named-data/ndn-cpp.git && cd ndn-cpp
git reset --hard 52152710bc7f12cbe22376b414bb5c05923f4d99    // release v1.0 (The latest version will fail to build.)
./configure
make
sudo make install clean
sudo /sbin/ldconfig
Requirements
sudo apt-get install fuse libfuse-dev pkg-config sqlite3 libprotobuf-dev protobuf-compiler libboost-all-dev libsqlite3-dev
Download from github and build NDNFS
git clone https://github.com/remap/ndnfs-port.git && cd ndnfs-port
export PKG_CONFIG_PATH=$PKG_CONFIG_PATH:/usr/local/lib/pkgconfig
export LD_LIBRARY_PATH=$LD_LIBRARY_PATH:/usr/local/lib
./waf configure --boost-lib=/usr/lib/x86_64-linux-gnu/
./waf
Configure NDNFS
Create two folder : One is the actual folder(dir), and the other one is the mount point folder(ndnfs).
mkdir /tmp/ndnfs
mkdir /tmp/dir
cd ndnfs-port
./build/ndnfs -s /tmp/dir /tmp/ndnfs
We have to put our files in the mount folder (/tmp/ndnfs). If someone puts files in actual folder and then mount this folder, we can not access the file via NDNJS fetch-media.js.(I think this is a bug.)
Then open NDNFS with a name by option -p
./ndnfs-port/build/ndnfs-server -p /ndn/tw/edu/ncnu/csie/jarvis/weeklyreport &
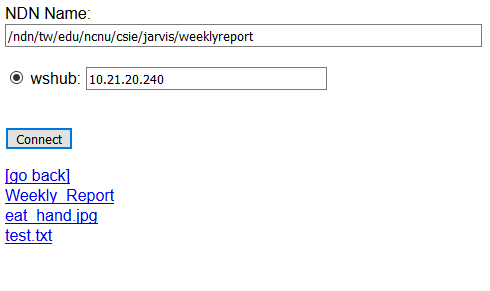
Test on NDN-JS fetch-media.html
Requirements
To test on NDN-JS, we also need NFD and NDN-JS. Please read installation guide - part 1 to install NFD.
And we don’t need to install NDN-JS because it just some JavaScript library, we can use them directly.
git clone https://github.com/named-data/ndn-js.git && cd ndn-js
git reset --hard 28012475e98cd769b23013f99b4d07cd329b7663
Make sure the Apache (Web Service) is open, this example have to use this machine as an Web Server.
Reference
- 1
- 2
NDN-CPP : https://github.com/named-data/ndn-cpp